Hey guys!
Today I will be teaching you guys how to draw a fall background. I really like backgrounds because they are calming to the mind and are very pretty. In the scene we are drawing today, we are focusing on a tree and falling leaves around it.
In this tutorial, you will need these items:
If you are working on paper: Paper, pencil, black outline pen, colors (watercolor, crayons, colored pencil) Markers aren’t preferred!
If you are working on the computer, you can use any drawing app. I used Sketchbook. It is free and works well.
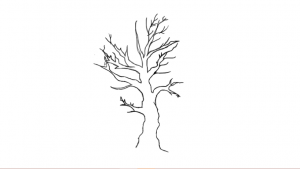
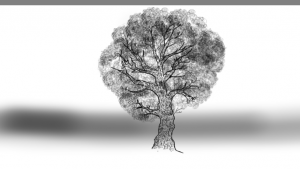
First, we draw the outline of the tree. You can use a pencil or a light tool on the computer app. In Sketchbook, I used the Paintbrush tool. You can use images on the internet for templates. This is what my tree outline looks like:

Your tree can look however you want it to look. It can be big, thin, or medium. It can have long roots reaching in and out of the ground, too. I made mine slightly thinner and more branches.
Next, we outline the tree to make it stand out more. I used the Ballpoint pen on the computer. On paper, you can use a regular black pen or ballpoint pen. After outlining, it should look cleaner and neater. You can erase the pencil markings, too.
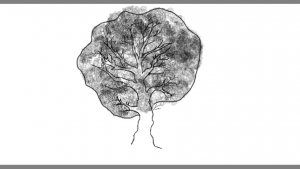
Next we can draw the leaves. First, we draw a sketch of the outline of the tree leaves. Like this:

This is just for a clearer image of the amount of leaves you want on your tree. If you don’t want to, it is optional.
Then, we can draw some extra small branches onto larger branches of the tree. This is to make it look like there will be more leaves attached to the smaller branches. Make sure you draw it in another layer or in erasable pencil.

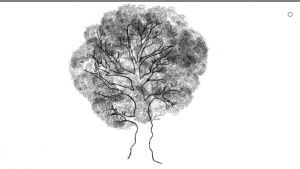
Since we have such a big tree, we wouldn’t want to draw each leaf one by one. That would just be a waste of time. So, we can draw scribbles with our pencils or paintbrush tool. For the paintbrush tool, set the settings to 0.3. You should sharpen your pencil until it is sharp and thin.
Next, we can erase the background outline for the leaves.
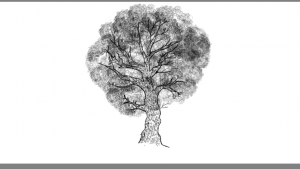
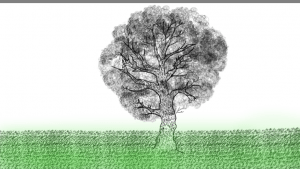
After that, we can start drawing the bark on the tree. On paper, You can just make dotted lines. Some can be shorter, some can be longer. On the computer, you can use the pencil tool to make the lines and dots. Make sure that there is a balance of short and long dots and lines!
Next, we can start with the ground. We can use the airbrush tool to make an outline of where the grass is going to start and end. On paper, you can make a light line with pencil to erase later.
Then, we can add dots to represent the grass. On the computer, you can duplicate the dots once you make enough of them. I used the chisel tip pen. On paper, Your stuck with dotting along the whole bottom paper with pen ._. Make sure you don’t dot on the bark of the tree.

Then, we can erase the line we made to guide you along when you make the grass.

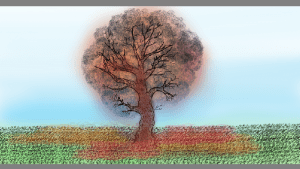
Now, We can start adding color! We do this to the grass first. the top should be lighter, while the bottom should have a darker tint. On Sketchbook, I used the airbrush tool. On paper, you should use colored pencil or watercolor.
For the sky, we can use a sky blue color. Darker on the bottom, lighter on the top, just like the grass.

Then, we can add orange and red to the leaves. You should mix the colors together and make a nice combination of orange-red:


Finally we can, add some leaves to the floor. You can use scribbles, and you can also add leaves falling from the trees. If you want leaves drifting down, here are some leaf templates:
I really like these leaves because they are simple and pretty.
When you have your leaves, you can add color to them and add more to the ground. Then you have your final piece of art!
What did your masterpiece look like? Share with me in the comments below!
Scarlett,
I am a teacher and guest commenter from New Jersey.
And all I can say is WOW! This was a really well-done tutorial for drawing! Unfortunately, I don’t have much skill in this area, but I read every word of what you wrote and may actually try this at some point. (I love to draw…just not good at it.) I’m guessing you might like to teach art someday? Or maybe you already do. This was so detailed, you made me think I could actually draw this! (And if I do, I will come back and show you my work!)
Happy blogging!
Karen Scott
Thank you so much! I really like to draw digitally and on paper. I like digital apps because they have effects that not all pens can create! I might consider teaching art someday as well. I would love to see what it looks like if you have the time! 😀
~Scarlett